


Ever wondered how some homes always have perfectly timed outdoor lights, shining just as evening falls? That’s the magic of outdoor lighting timers! These handy devices not only enhance your home’s curb appeal but also boost security and can save on electricity bills. Whether you’re new to using timers or looking to improve your setup, this guide has you covered. We’ll walk you through everything from understanding different types of timers to setting them up—be it mechanical, digital, or part of a smart home system. Let’s light up your outdoor space with ease and efficiency!
What Are Outdoor Lighting Timers?
What exactly is an outdoor lighting timer? It’s a device that automatically controls when your outdoor lights turn on and off, based on the settings you choose. This nifty tool can help you create an impression that someone is always at home, which can deter potential intruders, and it ensures you never come back to a dark home.Outdoor lighting is a vital part of home security and aesthetic appeal. If you're interested in further ways to enhance the safety and beauty of your space, consider how smart technology can make a difference. Learn more in our article, "How Smart Pathway Lights Can Enhance Your Home's Security and Ambiance," which explains the benefits of integrating smart lighting into your outdoor areas.

There are three main types of timers:
- Mechanical timers: These are the traditional type, often with a dial that you set manually to control the lights. They are simple to use and quite reliable but offer limited flexibility in terms of programming.
- Digital/electronic timers: These are more advanced, allowing for detailed scheduling and sometimes featuring built-in batteries to maintain their schedule even during a power outage. With digital timers, you can often set different on/off times for different days of the week.
- Smart timers/integrations with home automation systems: The most cutting-edge option, these can be controlled via smartphone apps or voice commands through home assistants like Amazon Alexa or Google Home. They can adjust lighting based on your habits, daylight hours, and even whether you’re home or away, thanks to geofencing technology.
The benefits of using timers for your outdoor lighting are numerous, including:
- Energy Efficiency: By ensuring lights are on only when needed, timers can significantly reduce wasted energy, which is both eco-friendly and good for your wallet.
- Security: A well-lit home can be less of a target for burglars, and timers keep lights consistent even when you’re away, giving the appearance of occupancy.
- Convenience: There’s no need to remember to turn lights on or off, as the timer does the work for you. Plus, you avoid the minor annoyance of manually controlling lights daily.
Whether you want to save energy, improve security, or simply add convenience to your life, setting up an outdoor lighting timer is a great step forward. In the following sections, we’ll guide you through the setup process for each type of timer to ensure your outdoor spaces shine bright at just the right time.
How to Prepare to Set Your Timer
Before getting started on setting up your outdoor lighting timer, follow these essential steps to ensure that everything goes smoothly:
- Gather Materials:
- The outdoor lighting timer.
- User manual or instruction sheet (if missing, download a digital copy from the manufacturer’s website).
- Basic installation tools like screwdrivers, pliers, and perhaps wire strippers if wiring is needed.
- Identify Timer Model:
- Determine whether you have a mechanical, digital, or smart timer.
- Note down the model number, as this will help when searching for specific instructions or troubleshooting tips.
- Ensure Safety:
- Turn off the power supply to the lights at the breaker box before installing or adjusting the timer to avoid electrical shock.
- Confirm that all switches that control the outdoor lights are in the “off” position.
- Installation Area Check:
- Inspect the area where you’ll be placing the timer—it should be easily reachable for future adjustments.
- If the timer is not specifically designed for outdoor installation, ensure it’s sheltered from inclement weather.
- For smart timers, check that your Wi-Fi network provides a strong enough signal at the installation location.
With these steps completed, you’re now ready to proceed with confidence. Whether you’re clicking a dial into place or syncing a smart device with your home network, being prepared is key to a successful setup.
How to Set Mechanical Timers
Mechanical timers are the simplest type of outdoor lighting timer and have been reliably used for years. Here’s how to set one up:
- Connect to Power Supply:
- Ensure your timer is switched off or unplugged.
- If it’s an in-line timer (one that gets installed on the power cord), follow the manufacturer’s instructions to properly install it between your outdoor light fixture and the power outlet.
- Set the Current Time:
- Look for the dial that represents a 24-hour clock face.
- Rotate the dial until the current time aligns with the indicator arrow.
- Make sure AM and PM times are correctly set if your timer distinguishes between them.
- Programming On/Off Times:
- Your mechanical timer might have segments or pins around the dial that you can push in or pull out. These represent your lights’ on/off times.
- Press down all segments or move pins to the “on” position for the times you want the lights to be on.
- For the times you want the lights off, leave the segments up or pins in the “off” position.
- Be precise with the settings, ensuring they match your preferred schedule.
- Additional Features (if applicable):
- Some mechanical timers come with additional features such as manual override switches. This allows you to bypass the timer without changing the settings.
- Familiarize yourself with these features in case you need to use them.
- Troubleshooting Common Issues:
- If the timer isn’t working, check to make sure it’s firmly plugged in and that the power source is live.
- Confirm the dial is not obstructed and can turn freely.
- Check that the pins or segments are correctly set for the desired times.
- Inspect whether the outlet timer is connected to has power and is operational.
Setting a mechanical timer might seem old-school, but it’s beneficial for its simplicity and reliability. Just a few adjustments and your outdoor lights will turn on and off just like clockwork. Remember to adjust the timer for daylight saving changes manually, as most mechanical timers won’t automatically account for the hour shift. With everything now set, you can enjoy the peace of mind that comes with knowing your outdoor area will be well-lit exactly when you need it to be.
How to Set Digital/Electronic Timers
Digital or electronic timers offer more flexibility and options compared to mechanical timers. Here’s how to program one for your outdoor lighting:
- Navigating the Menu and Settings:
- Most digital timers have a display screen and buttons for navigation.
- To begin programming, press the ‘Menu’ or ‘Set’ button. This will typically bring up options to set the current time and date, which is essential before programming on/off times.
- Setting the Current Time and Date:
- Use the appropriate buttons (often labeled as ‘Up’, ‘Down’, ‘Next’, or similar) to adjust the hours, minutes, and if required, the day of the week.
- Confirm each selection according to the timer’s instructions; this might involve pressing an ‘Enter’ or ‘OK’ button.
- Inputting On/Off Times and Days:
- Look for a ‘Program’ or ‘Timer’ function in the menu to start setting your on/off times.
- elect the ‘On’ time for your first program. Set the hour and minute, and then specify the days of the week this time applies to (e.g., every day, weekends only, etc.).
- Repeat the process to set the ‘Off’ time for your lights.
- If your timer allows for multiple programs, you can repeat these steps to create different schedules—say, one for weekdays and another for weekends.
- Setting Up Daylight Savings and Random Modes (if available):
- Many digital timers feature a daylight savings time mode that automatically adjusts the clock when necessary.
- A random mode may also be available, which varies the on/off times slightly each day to simulate presence at home for added security.
- Saving and Exiting Setup:
- Once all programs are entered, save your settings. There might be a ‘Save’ or ‘Done’ button.
- Exit the setup menu, often by pressing a ‘Menu’ or ‘End’ button, or by simply waiting a few moments—the timer may return to normal operating mode on its own.
- Troubleshooting Common Issues with Digital Timers:
- If the timer doesn’t turn the lights on or off at the scheduled times, ensure that it has been correctly programmed and that you’ve saved the settings.
- Check the timer’s battery backup if fitted; a low battery can cause a loss of programming.
- Ensure that the timer display shows the correct current time and day, as mistakes here can affect the on/off schedule.
Digital timers give you the control to tailor your outdoor lighting perfectly to your lifestyle and can accommodate changes in the schedule without much fuss. They’re a great investment to make sure your outdoor spaces are lit exactly how and when you want them to be, giving you both convenience and peace of mind.
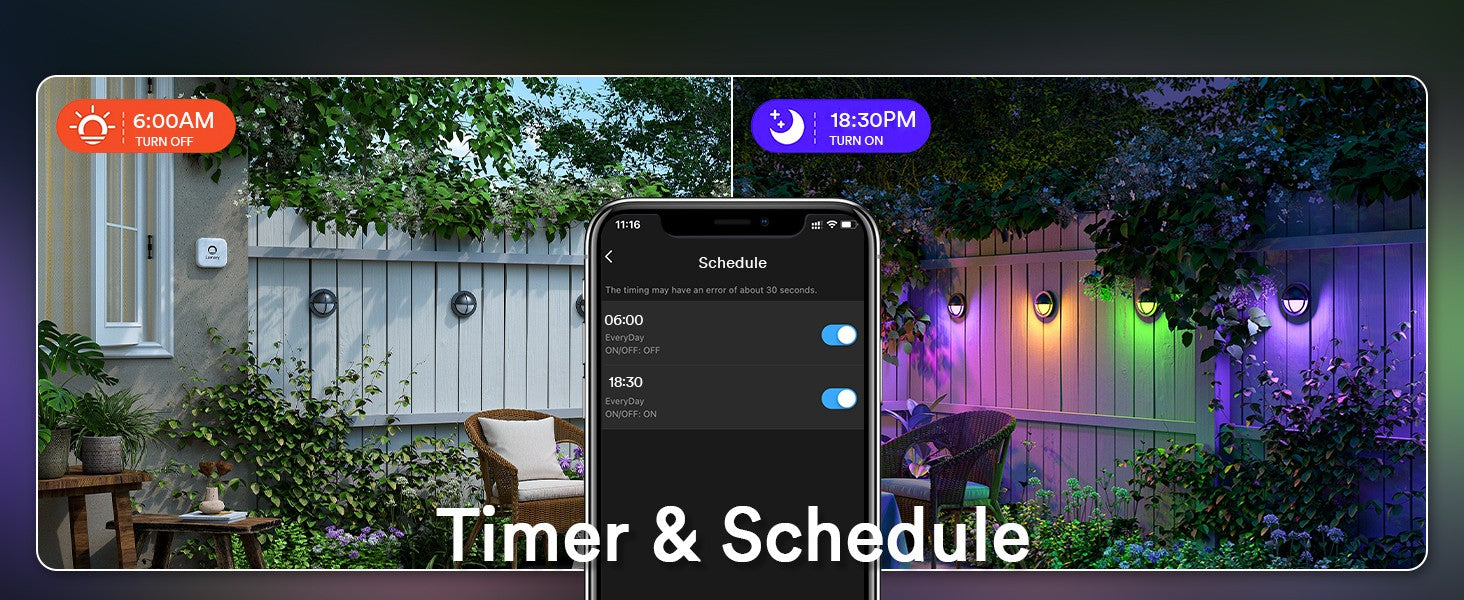
How to Set Smart Timers/Home Automation Systems
Smart timers and home automation systems represent the pinnacle of convenience and efficiency in managing outdoor lighting. They offer remote control, scheduling flexibility, and integration with other smart devices. Here’s how you can set them up:
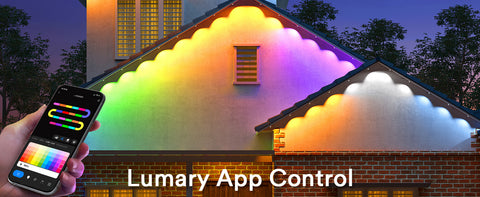
- Installing the App or Software:
- Download the app associated with your smart timer or home automation system onto your smartphone or tablet.
- Create an account if required, and follow the setup instructions provided by the app.
- Integrating with Existing Home Network:
- Make sure your smartphone or tablet is connected to your home Wi-Fi network.
- Use the app to connect the smart timer to the same Wi-Fi network. This may involve entering the Wi-Fi password and possibly pressing a button on the timer itself to make it discoverable.
- Customizing Settings Based on User Preferences:
- Once connected, use the app to customize your settings.
- Set specific times for lights to turn on and off, or create more complex schedules based on sunrise/sunset times, which many smart systems can adjust to automatically.
- Configure other preferences such as dimming capabilities, color-changing features (if your lights support this), and any other advanced options available with your timer or lights.
- Explore integrations with other smart home devices, like motion sensors or cameras, to enhance functionality and security further.
- Ensuring Security and Privacy Within Your Home Network:
- Always ensure your Wi-Fi network is secured with a strong password.
- Update the firmware of your smart timer and router regularly to protect against vulnerabilities.
- Consider setting up a guest network or a separate network for your smart home devices for added security.
- Troubleshooting Connectivity and Setup Issues:
- If the timer fails to connect to your network, double-check your Wi-Fi credentials and signal strength.
- Restart the timer and your router to resolve connectivity issues.
- Refer to the app’s help section or contact customer support if you’re unable to troubleshoot issues on your own.
Smart timers and home automation systems for outdoor lighting add a layer of modern convenience and efficiency that traditional timers can't match. With these systems, not only can you control your lights from anywhere at any time, but you can also enjoy the benefits of adaptive scheduling and integration with other smart home devices. Imagine adjusting your outdoor lighting to reflect the mood of the evening or the season's demands—all without ever needing to physically touch a switch or remote. Once everything is set up, sit back and watch as your home becomes a beacon of smart technology, perfectly lit at all times without any manual intervention. And for those times when you need to tweak your settings or your remote isn't on hand, you'll want to know 'How to Change LED Lights Without a Remote.' Find out the simple steps to maintain control over your LED lighting, ensuring seamless operation, no matter the circumstances.
Optimizing Home Safety and Ambiance with Outdoor Lighting Timers
Outdoor lighting timers, whether mechanical, digital, or smart, offer an efficient way to manage your home’s exterior illumination—enhancing security, saving energy, and showcasing your property’s aesthetic appeal. They simplify life by automating the on/off schedule of your lights, ensuring your home looks occupied even when it’s not, and providing a welcoming atmosphere upon your return. Maintaining these devices is straightforward, ensuring they reliably brighten your outdoor spaces night after night. In essence, by integrating the right timer, you can achieve a perfect blend of safety, efficiency, and beauty in your home’s outdoor lighting setup.

